Cream Cheese Danishes

Cream Cheese Danishes are soft, flaky pastries made with buttery dough and a smooth, sweet cream cheese filling in the center. They are often baked until golden and slightly crisp on the outside, while the inside stays creamy and rich. Many people enjoy them for breakfast, brunch, or as a sweet snack during the day. Even though they look fancy, Cream Cheese Danishes are surprisingly easy to make at home, especially when you use a few smart shortcuts.

These pastries are loved all over the world because they taste cozy and comforting. The creamy filling melts gently as it bakes, and the pastry puffs up around it like a warm hug. Kids like them because they are sweet and soft, and adults like them because they taste like something from a bakery. You can keep them plain or add fruit like strawberries, blueberries, or cherries to make them extra special.
You Should Try Cream Cheese Danishes
Cream Cheese Danishes are a wonderful recipe to try because they are simple, fun, and very rewarding. You don’t need to be a professional baker to make them turn out delicious. With just a few ingredients and easy steps, you can create a treat that looks impressive but feels stress-free to prepare. This recipe is perfect for beginners, families, or anyone who wants a homemade bakery style pastry without too much work.
Another reason to try these danishes is how flexible they are. You can change the flavors, shapes, and toppings to match what you like or what you have at home. You can make them sweeter, less sweet, fruity, or plain. They are also great for sharing at parties, school events, or family breakfasts. Once you make them once, you’ll want to make them again and again.
Table of Contents
Ingredients for Cream Cheese Danishes
Here’s everything you’ll need to make this Cream Cheese Danishes:
- Puff pastry sheets store bought, thawed
- Cream cheese softened
- Granulated sugar
- Vanilla extract
- Egg for egg wash
- Powdered sugar optional, for glaze
- Milk or water for glaze
- Optional fruit topping like strawberry jam or fresh strawberries
How to Make Cream Cheese Danishes
Step One :Prepare the oven and pastry
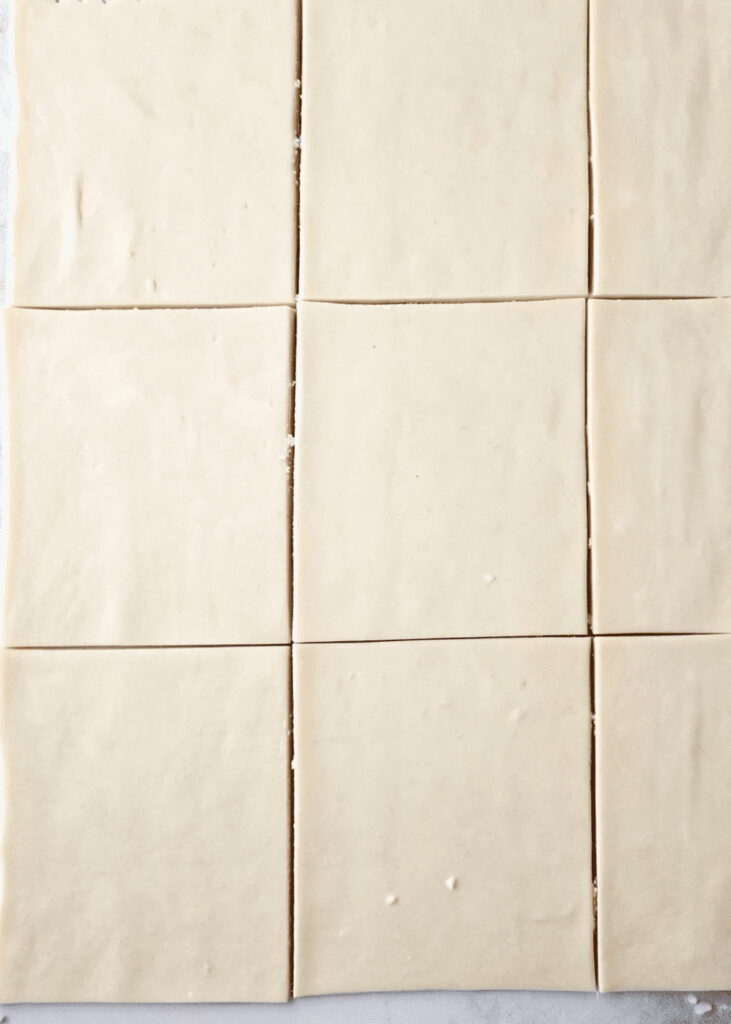
Before you start shaping your danishes, make sure to preheat your oven to 400°F (200°C) so it reaches the perfect temperature for baking. While the oven is warming, line a baking sheet with parchment paper to prevent the pastries from sticking. Carefully unfold your thawed puff pastry sheets on a clean, lightly floured surface, and gently press any cracks or folds with your fingers so the dough is smooth and even. Taking a little extra time here ensures that your pastries bake evenly and puff up beautifully.
Step Two :Make the cream cheese filling
In a medium-sized mixing bowl, combine the softened cream cheese, granulated sugar, and vanilla extract. Use a spoon or spatula to mix everything together until it becomes completely smooth and creamy, without any lumps. If the cream cheese is too cold or hard, it might not blend well, so letting it sit at room temperature for a few minutes beforehand can make a big difference. This filling will be the star of your danishes, so it’s worth taking your time to get it perfectly smooth.
Step Three :Cut and shape the pastry
Once your pastry sheets are ready, use a sharp knife or pastry cutter to slice the dough into equal squares or rectangles, depending on how big you want your danishes to be. Make sure to leave enough space on your baking sheet between each piece so they have room to puff up without sticking to each other. Neatly cutting the squares not only helps them bake evenly, but it also makes them look beautiful and uniform once they’re finished.
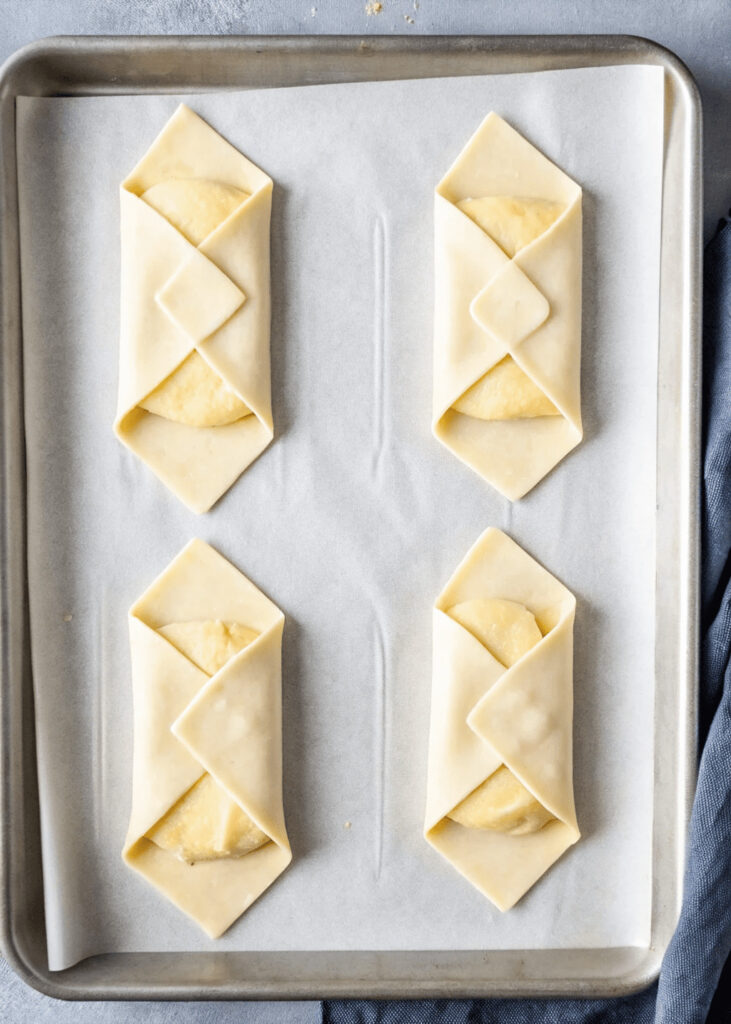
Step Four :Add the filling
Take a spoon and carefully place a small mound of the cream cheese mixture into the center of each pastry square. Try not to overfill, because the filling can bubble over and make a mess during baking. You want just enough so that each danish has a nice, creamy center while still leaving the edges of the pastry free to puff up and become golden.
Step Five :Optional fruit topping
If you want to add a fruity touch, now is the time to do it. Spoon a small amount of strawberry jam or place a few pieces of fresh strawberries on top of the cream cheese filling. This will add flavor, color, and a little natural sweetness that pairs perfectly with the creamy filling. Be careful not to add too much fruit, as extra moisture can make the pastry less flaky.
Step Six :Brush with egg wash
In a small bowl, beat one egg and then gently brush the edges of each pastry square with the egg wash. This step is what gives the danishes that beautiful golden-brown shine once they bake. Take your time brushing so every edge is coated, but avoid getting egg wash on the cream cheese filling, or it could bake into a crusty layer.
Step Seven :Bake
Place your prepared baking sheet in the preheated oven and bake for about 15–20 minutes. Keep a close eye on them as they bake, because every oven is a little different. You want the pastries to puff up fully and turn a nice golden brown, while the filling should look set but still creamy in the center. The smell of baking pastry and sweet cream cheese will fill your kitchen, making it hard to wait for them to finish.
Step eight : Cool and glaze
Once baked, carefully remove the danishes from the oven and let them cool for a few minutes on the baking sheet. If you want to ad a sweet glaze, mix powdered sugar with a little milk or water until smooth, and then drizzle it lightly over each danish. The glaze adds an extra touch of sweetness and makes the pastries look even more tempting, but you can also skip it if you prefer a simpler presentation.

Kitchen Equipment Needed :
To make this Recipe, you’ll need:
- Baking sheet
- Parchment paper
- Mixing bowls
- Spoon or spatula
- Knife or pastry cutter
- Pastry brush
- Oven
Tips for the Best Cream Cheese Danishes
Let cream cheese soften at room temperature so it mixes smoothly.
Don’t overfill the pastries to avoid messy baking.
Chill the pastries for 5 minutes before baking if the dough feels too warm.
Add lemon zest to the cream cheese for extra flavor.
Serving Suggestion
I love serving these Cream Cheese Danishes with delicious drinks like fruit juice or lemonade, and sometimes my husband also likes them with coffee for a wonderful morning.

Frequently Asked Question
Can I freeze Cream Cheese Danishes ?
Absolutely. Bake and cool them first, then freeze in an airtight container for up to 2 months. Reheat in the oven to enjoy fresh-tasting pastries.
How long do Cream Cheese Danishes last ?
In the fridge, they stay good for up to 3 days. Warm them slightly before eating for the best taste.
Can I use other fruits besides strawberries ?
Yes! Blueberries, raspberries, cherries, or even apple slices work well. Just avoid very watery fruits.
Can I add chocolate chips to the filling ?
Yes! Mini chocolate chips melt slightly in the oven and taste amazing with cream cheese.

Cream Cheese Danishes
Course: Breakfast, Brunch, Snacks, DessertCuisine: AmericanDifficulty: Easy to Medium12
servings20
minutes20
minutes300
kcal40
minutesSoft, flaky pastries filled with creamy sweetened cream cheese and optionally topped with fresh fruit or jam. Perfect for breakfast, brunch, or a sweet snack, these danishes are easy to make at home using store-bought puff pastry.
Ingredients
Puff pastry sheets store bought, thawed
Cream cheese softened
Granulated sugar
Vanilla extract
Egg for egg wash
Powdered sugar optional, for glaze
Milk or water for glaze
Optional fruit topping like strawberry jam or fresh strawberries
Directions
- Before you start shaping your danishes, make sure to preheat your oven to 400°F (200°C) so it reaches the perfect temperature for baking. While the oven is warming, line a baking sheet with parchment paper to prevent the pastries from sticking. Carefully unfold your thawed puff pastry sheets on a clean, lightly floured surface, and gently press any cracks or folds with your fingers so the dough is smooth and even. Taking a little extra time here ensures that your pastries bake evenly and puff up beautifully.
- In a medium-sized mixing bowl, combine the softened cream cheese, granulated sugar, and vanilla extract. Use a spoon or spatula to mix everything together until it becomes completely smooth and creamy, without any lumps. If the cream cheese is too cold or hard, it might not blend well, so letting it sit at room temperature for a few minutes beforehand can make a big difference. This filling will be the star of your danishes, so it’s worth taking your time to get it perfectly smooth.
- Once your pastry sheets are ready, use a sharp knife or pastry cutter to slice the dough into equal squares or rectangles, depending on how big you want your danishes to be. Make sure to leave enough space on your baking sheet between each piece so they have room to puff up without sticking to each other. Neatly cutting the squares not only helps them bake evenly, but it also makes them look beautiful and uniform once they’re finished.
- Take a spoon and carefully place a small mound of the cream cheese mixture into the center of each pastry square. Try not to overfill, because the filling can bubble over and make a mess during baking. You want just enough so that each danish has a nice, creamy center while still leaving the edges of the pastry free to puff up and become golden.
- If you want to add a fruity touch, now is the time to do it. Spoon a small amount of strawberry jam or place a few pieces of fresh strawberries on top of the cream cheese filling. This will add flavor, color, and a little natural sweetness that pairs perfectly with the creamy filling. Be careful not to add too much fruit, as extra moisture can make the pastry less flaky.
- In a small bowl, beat one egg and then gently brush the edges of each pastry square with the egg wash. This step is what gives the danishes that beautiful golden-brown shine once they bake. Take your time brushing so every edge is coated, but avoid getting egg wash on the cream cheese filling, or it could bake into a crusty layer.
- Place your prepared baking sheet in the preheated oven and bake for about 15–20 minutes. Keep a close eye on them as they bake, because every oven is a little different. You want the pastries to puff up fully and turn a nice golden brown, while the filling should look set but still creamy in the center. The smell of baking pastry and sweet cream cheese will fill your kitchen, making it hard to wait for them to finish.
- Once baked, carefully remove the danishes from the oven and let them cool for a few minutes on the baking sheet. If you want to ad a sweet glaze, mix powdered sugar with a little milk or water until smooth, and then drizzle it lightly over each danish. The glaze adds an extra touch of sweetness and makes the pastries look even more tempting, but you can also skip it if you prefer a simpler presentation.
Notes
- Let cream cheese soften Room temperature cream cheese mixes smoothly and prevents lumps in the filling.
- Don’t overfill Too much filling can spill out and make a mess while baking.
- Chill before baking (optional) If your dough feels soft or warm, chill for 5 minutes to help it hold its shape.
- Experiment with flavors Add lemon zest, cinnamon, or vanilla to the cream cheese filling for extra taste.
You can add this post to your favorite Pinterest board!